465Views7likes28Comments
Sneak Peek: Type-Ahead Search Picker
While we at Quickbase love to work on great new features, like Kanban reports or Automations, we also take time to focus on the fundamentals. And what could be more fundamental to Quickbase than quickly and accurately entering data? So many of our customers tell us they come to Quickbase apps because they've outgrown spreadsheets and need to move to a relational database to handle the complexity of the work they need to track. Recently, we've been taking a hard look at how we can improve this fundamental activity of Quickbase apps: relating data. What did we find? After talking to customers with big data sets and small, we realized our record picker needed to be better at finding records quickly and making sure users knew exactly what record they were picking! If you're not familiar with our record picker, here's a crash course. (You can find out more about configuring it in Quickbase University.) When you're working with a relatively small data set, we show a simple HTML drop down. It works well if you've got some easily discernible records and you know what you're looking for, but if you've got a larger set of data, it can be much harder to find what you're looking for. Now, one of the things we all love about Quickbase is how deeply customizable it is. So what if I want to only pick from records which meet a certain criteria? Or if I want to make sure the most likely to be picked options are at the top? Quickbase has a solve for that! In the form properties, you can choose a report on which to base the record picker, which allows you filter and sort the field. It's great that you can apply sorts and filters, but unless you really trim down the columns, it can be really hard to read for end users. Beyond that, they may not understand what data is displayed in the list and given that each record displays all its data on one line, it can be hard to match up values to compare them. In addition, our users told us they expected to search through these records to find what they were looking for, but our simple record dropdown doesn't support that. For search, we need to go into the record picker pop-up. In field properties, you can configure this relationship to always use our record picker pop-up but getting to it requires more clicks and takes the user out of the context of the record they're editing. What we found in talking to customers was that their teams needed a faster way to search their data. After seeing all this, we got to work. Presenting the new Quickbase Type-Ahead Search Picker: If your app builder has chosen to display only one field to pick records on, we're now going to present a fast, searchable picker, very much like the new field picker we rolled out back in spring or the user picker we've have. If your app builder has chosen a report or the standard record picker to select from, you'll see a multicolumn picker, able to display up to nine fields of relevant data, with each column labeled so users clearly can see what they're picking from. We load the first 50 results automatically, so users can browse. As you search, the list updates in real time, pulling in more records and highlighting the matching terms, very much like our user field type. This new picker will be rolling out to all users in the coming months. If you'd like a sneak preview, we have it available in early access starting the week of September 24th. Just have your realm administrator open a support ticket and request it at https://login.quickbase.com/qb/support/listcases Thanks for reading and be on the look out for more posts and previews about our new type-ahead search picker! Sam Jones Quickbase Product Manager304Views0likes58CommentsService Worker to the Rescue
There has been a lot of traffic opining about the new release that changed various aspects of the GUI. To be honest I didn't read most of the posts in detail nor do I have any problem overcoming any of the undesirable changes. That is because I can modify any aspect of QuickBase using Service Workers. You can to. As an example, here is a grid edit viewof an application that shows the current green New Record button which I want to remove using a Service Worker: Here is a screenshot of the same page where a Service Worker has removed the green button: Now you may be wondering what the left hand panel is and why the URL is showing the domain https://cloudflareworkers.com/. In a nutshell, cloudflare has implemented a jsfiddle like service where you can demonstrate and share the implementation of a Service Worker as applied to any URL. It just turns out that this is an easier way for me to publiclly share a Service Worker demo rather than implement it wholly within QuickBase. Here is full source of the Service Worker used above: addEventListener("fetch", event => { event.respondWith(fetchAndModify(event.request)); }); async function fetchAndModify(request) { console.log("got a request:", request); // Send the request on to the origin server. const response = await fetch(request); // Read response body. const text = await response.text(); // Modify it. const modified = text.replace( '<a onclick="GE_embMenu_newRec(this)" id="GE_NewRecordPick">New Record</a>', ""); // Return modified response. return new Response(modified, { status: response.status, statusText: response.statusText, headers: response.headers }); } Basically the Service Worker looks for the <a> element associated with the New Record button and removes it - BEFORE THE BROWSER EVEN STARTS TO RENDER THE PAGE. Now the important thing to notice is that this very same Service Worker implemented as a part of the CloudFlareWorker demo can be used as a client side Service Worker. (wholly within QuickBase) Now I could write a hundred pages extolling the virtues of using Service Workers with QuickBase but the bottom line is there is nothing Service Workers can't do. Service Workers is god mode for QuickBase. UPDATE: I forgot to post the link: https://cloudflareworkers.com/#28a28d6d0a693d85a38d856f44a8de37:https://haversineconsulting.quickbas...~ Similar to a jsfiddle, you can modify the Service Worker code in the left panel and create your own version for experimentation before porting the code to your own application.135Views1like20CommentsIOL Technique Officially Approved By QuickBase
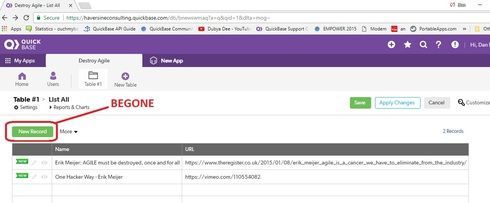
I missed this the other day when I posted about the form used by QuickBase on thier Quick Base Customer Awards nominations. In my post I mentioned that QuickBase had created a custom Save button that saved and redirected to a unique page and I also presented the code they used. What I forgot to mention (I missed seeing it) is that QuickBase itself is using a version of the IOL technique to hide the native Save button so as to make the custom Save button the only functioning button. The Forum post has been removed: https://community.quickbase.com/quickbase/topics/quick-base-customer-awards-nominations-are-open But the new record pages are still accessible: The Quick Base Hero Award ~ Add New Record https://team.quickbase.com/db/bneu8emfj?a=nwr If you watch very carefully upon page reload you can see the Save button momentarily appear and is then rapidly hidden. The HTML code QuickBase is using to achieve this is as follows: <table id="sect_s8" class="formSection LabelsAbove"> <tr class="formRow "> <td id="tdl_23" class="label lc RichTextField" colspan=100> <label class="fieldLabel " for='_fid_21'><b >Hide Green Buttons</b></label> <div id="tdf_23" class="cell dc RichTextField" > <img src='/i/clear2x2.gif' onload="javascript:$(document).ready(function(){$('.IconOnly').hide();$('#saveButton').hide();})"> </span> </div> </td> </tr> </table> Here is a screenshot of the relevant HTML in the inspector (which helpfully points out an unbalanced </span> element) The code above basically uses the image onload technique I created almost a decade ago but simply does not use a code page because the script in question was so short. So we have to conclude that QuickBase sees the value in script as a handy workaround and will be working hard to provide a supported way to introduce script into the product. For reference here is the accompanying post that described how QuickBase formed their custom Save button: This is !important https://community.quickbase.com/quickbase/topics/this-is-important Pastie Database https://haversineconsulting.quickbase.com/db/bgcwm2m4g?a=dr&rid=63395Views4likes7Comments
Service Worker
I am working on implementing changes with Service Workers. I am following the series of posts from Dan Diebolt, Service Worker Travel Logs, and it is making sense. The one part I am stuck on is in the last one; https://community.quickbase.com/quickbase/topics/service-worker-travel-log-day-13, specifically implementing the cheerio.js library. Do I need to bring over every file in the GitHub page, or is there a way to simply reference them all at once?91Views1like7CommentsCreating a Survey to Collect Data from Non-users
At the end of each course in Quick Base University, our training team uses a Quick Base app that I created to collect feedback from our learners. Some of our leaners are users in our app and some are not. We want to collect feedback from everyone whether they are users in our realm, our app, or non-users (people who do not have permission on our realm or in our app). To do this, I created a form and a role for the group ÒEveryone on the InternetÓ (EOTI). The team then creates a custom URL and embeds it on the web page in the last lesson of each course. 1. Create a survey form with a submit button You need a table to house survey questions. I create different tables for each type of survey because it makes reporting easier. I suggest using short field names. For example, if the question is, ÒHow would you rate your overall experience on Quick Base University?Ó, a good field name might be ÒOverall ExperienceÓ. Then when you create the form, you can add the full text as an alternate label. Be sure to add a Submit button. Create it using a Formula-Rich Text field type. The formula for the button is: "<a class='Vibrant Success' onclick='DoSaveAdd()' href='#'>Submit</a>" You can edit the default form or create a second form. I use 2 separate forms, a form for my teamÕs role and a form for my EOTI view, because I have fields that our team uses to add comments and assign feedback for team members to address. 2. Create a redirect HTML page I created a simple thank you page. You can use code pages to create an html page. You will need this page to load after a user submits feedback. You may want to include some text or images on this page to notify the user that the survey has been submitted. 3. Create a role with permissions to see only the necessary fields I create an EOTI role. I do this so that whenever I see the role I know that it is open to everyone and I need to be cautious about the permissions that I set. I usually set the role permissions on a survey table to only be able to add a record. I add custom rules for fields, so users assigned this role can see and modify only the fields on the form. You can create an EOTI role and assign it to the ÒEveryone on the InternetÓ group. This will allow non-users to respond to your survey. 4. Invite the ÒEveryone on the InternetÓ group to your app To allow non-users to access the survey, I shared the app with the ÒEveryone on the InternetÓ group. When you are sharing with a new user, if you type Everyone, the group will populate for you. Set the role for this group to the EOTI role that you just created. 5. Create the URL The team creates a unique URL for each course that they develop. You can edit the URL and then either add it as a link or use an iframe to embed it on another page. Copy the form URL from your browser. It will look something like this: https://team.quickbase.com/db/bneukue8v?a=nwr You can hide the Quick Base interface by adding &ifv=1 to the end of your URL. It will look something like: https://team.quickbase.com/db/bneukue8v?a=nwr&ifv=1 Our team wants to know which course the feedback came from, so we create a slightly different link for each course. We set the Course Number field in the URL. You can use &_fid= to set the text in the field. The Course Number field is field number 22 in our app. We add the course number after the =. In this example the course number is ZZZZ. https://team.quickbase.com/db/bneukue8v?a=nwr&ifv=1&_fid_22=ZZZZ Our team wants our end users to know that their feedback has been received, so we use a redirect page which loads after the survey has been submitted. You can use &nextURL= to redirect the iframe or page. You can find the URL for the page by going to the Pages page in your app, previewing the page, and copying the URL from your browser. The URL will look something like this: https://team.quickbase.com/db/bneuj8f7m?a=dbpage&pageID=2 You need to encode anything in the URL that is not a number or letter. HereÕs the encoding you will need: Your final URL will look something like this: 6. Link or embed the URL On our team, we embed the survey using an iframe. You can embed the link with an iframe or use the URL to create a link on a webpage or in an email. If you are embedding the form into another web page, wrap the URL in an iframe tag, like this: <iframe src="https://team.quickbase.com/db/bneukue8v?a=nwr&ifv=1&_fid_22=ZZZZ&nextURL=https%3A%2F%2Fteam.quickbase.com%2Fdb%2Fbneuj8f7m%3Fa%3Ddbpage%26pageID%3D2"></iframe> You are now on your way to gathering feedback using a Quick Base app. What do you want to learn next? Go to Quick Base University or leave a comment below.61Views0likes3Comments
summary report formulas
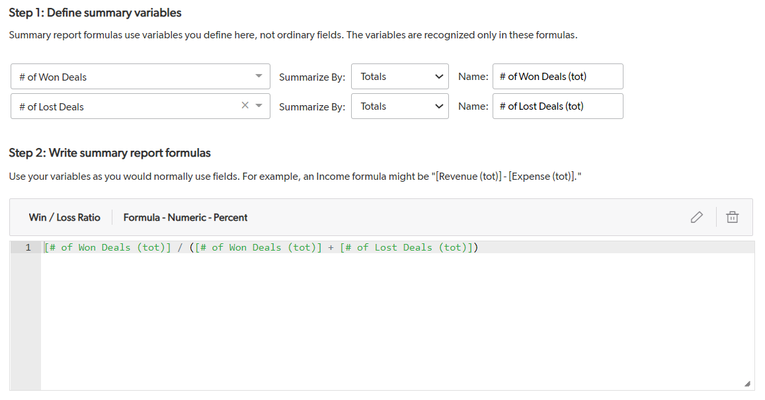
As a Data Analyst at Quickbase, I'm often asked to create reports and scorecards to track our performance over time. In most cases, it's easy to provide this data with the summary report feature – it can be done simply by adding the numeric fields to the report, choosing how to aggregate them (sum, average, etc.) and grouping by the appropriate date fields. But what can you do when you're asked to perform additional calculations on those aggregated metrics? Some people refer to this as the averages of averages problem, even though it is much more! There are plenty of these scenarios in every department: lead conversion in marketing, quota attainment in sales, net retention in finance, just to name a few… Also, different business units often have their own targets, and they need reports to inform how they are executing against them on a monthly, quarterly and annual basis. Since this was not possible on summary reports, my usual workaround was creating new tables, adding summary fields and doing the final calculations there. I'm very excited that now our product has a new feature called summary report formulas, which makes those calculations much easier than before, and will save me a lot of time and effort! Now, all I need to do is create a summary report on my source table, choose how to group my data and follow 3 simple steps: 1. Define summary variables – Simple example – Calculating win / loss ratio in Sales. Values to define: Total # of won deals Total # of lost deals. Complex example: Calculating utilization ratio against target for a customer support center. Values to define: Duration of direct customer support (hours) Duration of additional customer support tasks (hours) # of vacation hours # of sick leave hours 2. Write summary report formula – Formula to calculate win / loss ratio: Total # of won deals/ (Total # of won deals + Total # of lost deals) Formula to calculate utilization ratio against target (assuming that the report is grouped by week and by rep, each support rep works 40h a week and is expected to have a utilization of 60%): (Duration of direct customer support (hours) + Duration of additional customer support tasks (hours)) / (40 - # of vacation hours - # of sick leave hours) / 0.6 3. Add my new field(s) to the report. This way, instead of creating separate tables with calculations for each time period, I can build all of my reports with percentage calculations on the same table. Stakeholders won't have to wait for me to create a few tables, join them, add summary fields, and then write the formulas to get the results. Thanks to summary report formulas, I will be able to deliver data to the business in minutes, rather than days and hours! This feature is currently in beta. You can express interest in our beta registration application. We are inviting people into the program in waves but if you believe you have a use case that may enable you to provide valuable feedback on this feature, please reach out to your account team. ------------------------------ Aleksandra Cybulska ------------------------------60Views0likes0CommentsHow to install BOL (Branding On Load)?
We previously posted the BOL (Branding On Load) instruction as a file attachment but in the conversion to the new forum attachments were dropped. Here is an updated method of installing BOL: Step 1 Create a code page named moduleBOL.js and place some simple content in it such as this one line of code: console.log("moduleBOL.js loaded"); Step 2 Visit your Branding Page https://<YOUR SUBDOMAIN>.quickbase.com/db/<YOUR APP DBID>?a=AppPropertiesBrandGuide Step 3 To turn BOL ON, press F12 and paste this code into the console tab: //turn on BOL (function(){ var page = "moduleBOL.js"; var formData = new FormData(); formData.append("PageToken", $("input[name=PageToken]").val()); formData.append("customHeader", "on"); formData.append("uiCustomHeaderOptions", "iBasic"); formData.append("uiCustomTextColor", 'white !important\n}</style><img src='' style='display:none' onerror=$.getScript(gReqAppDBID+'?a=dbpage&pagename=${page}');><style>foo {\nbar: baz'); fetch("?a=SaveAppSettingsBrandGuide", { method: "POST", body: formData, credentials: "include" }); })(); Step 4 To turn BOL OFF, return to the branding page, press F12 and paste this code into the console tab: //turn off BOL: (function(){ var formData = new FormData(); formData.append("PageToken", $("input[name=PageToken]").val()); formData.append("uiCustomHeaderOptions", "iDefault"); formData.append("uiCustomTextColor", "white"); fetch("?a=SaveAppSettingsBrandGuide", { method: "POST", body: formData, credentials: "include" }); })(); Notes: 1) This code uses the Fetch API, the FormData API and ES6 backticks. You can google these terms or ask a question here if you need a better understanding. 2) Some people have inquired about the credentials: include property and value used in the code. This is not your QuickBase login/password credentials and is perfectly safe to use. By default the Fetch API does not send cookies so including credentials: include merely sends your cookies to QuickBase which includes your ticket. Sending your cookies to QuickBase is the normal operation. 3) Setting up BOL will include moduleBOL.js on every page in your application including administrative pages. In contrast the IOL technique injected code only into {new, view, edit, report, grid edit} pages. Also, moduleBOL.js will load relatively early in the process of loading your page. You will have to supply your own decoding logic to determine what page you are on and what actions you want to take. 4) Part of the reason we are introducing this version of BOL is to acquaint you with the Fetch API, the FormData API and ES6 features (not just backtick). These are powerful features to use with QuickBase in their own right as you can do some amazing things in a short amount of code. 5) But the real reason is to slowly introduce you to Service Workers which will blow away all these other methods of introducing JavaScript into your QuickBase pages and provide amazing new features you never though possible in a browser (like offline QuickBase - nope I am not joking). In the next few days (maybe tomorrow - it depends on if I get my grass cut today) we will launch the Service Worker Travel Log which will feature a new aspect of using Service Workers with QuickBase. So clear you head, pack your bags and bring lots of cash as we embark on a 30 day adventure of using Service Workers with QuickBase.59Views3likes7CommentsAnnouncing QuickBase Service Worker Council and QuickBase Crank
The newly formed QuickBase Service Worker Council met this morning for breakfast at the annual QuickBase Empower conference in Boston to welcome new members, clarify it's charter and review new applications that incorporate Service Worker technology into QuickBase. I am happy to announce the the Service Worker Council has unanimously voted to implement and release the QuickBase Crank proposal which will allow QuickBase users to significantly speedup their QuickBase applications. QuickBase Crank allows a user to configure a custom Service Worker which can modify the caching policy of critical assets such as JavaScript and CSS files, substitute a minimized and faster loading version of an asset or even block the loading of subordinate assets that are not critical to the performance of a QuickBase application. Initial testing of QuickBase Crank have demonstrated a twofold increase in page loading times as well as the potential for offline usage of a QuickBase application with later synchronization when network connectivity is regained. In addition to its technical capabilites - which are quite impressive - QuickBase Crank requires no external services or subscription fees and is widely supported in modern evergreen browsers. The QuickBase Service Worker Council is also announcing a call for new members and new features to implement with Service Worker technology. If you would like to participate in the Service Worker Council meetings and deliberations or have a suggestion for using Service Worker technology with QuickBase feel free to reply to this message or contact me off-line using the information in my profile.58Views3likes3Comments