Working Copy to Clipboard Button
I've created a button to copy the content of a field to the clipboard that I thought would be useful to others. It copies the content of the field and then shows an alert that confirms what was copied. I've tested it with Chrome and Firefox which works, Edge did not. I used a Vibrant button, which allows me to put it into a Rich Text field with other buttons, instead of a Formula URL field. It will work with the URL field as well if you remove the button code. Hope this helps. Dana var text CB= URLEncode([Some Field]); var text Alert= URLEncode([Some Field] & " Was Copied to the Clipboard"); "<a class='Vibrant Success' style=\"border:0px solid green; background-color:green; text-align: center;\"href=" & "javascript:{" & "navigator.clipboard.writeText('" & $CB & "').then(function(){" & "},function(){" & "});" & "alert('" & $Alert & "');" & "};" & ">Copy to the Clipboard</a>"899Views1like30Comments
Lat/Long
I need to build a Heat Map for our executive team displaying saturation of certain geographically defined areas. Sadly, QB doesn't allow for a heat map organically, and most tools require the use of Lat/Long in order to render correctly. Does anyone know of a formula that would convert the organic "Address" field into a Lat/Long? Thanks, Mike618Views1like16Comments
Find the nearest Starbucks using QuickBase
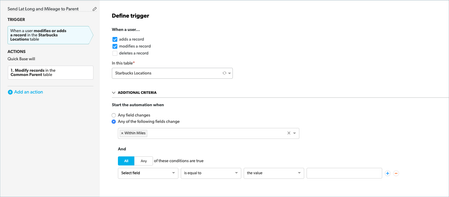
Last week Howard popped into an "Office Hours" webinar asking about how to find the closest customers to a given Latitude and Longitude location. Well you can do that with QuickBase. I went looking for a CSV file with a bunch of Latitude and Longitude locations and I found a file with all the Starbucks locations in the US. The essence of the application is to find a Starbucks, enter the distance you want to search and return a report and map of all those locations within that distance. This can be calculated if you have both the Home and the Destination's Latitude and Longitude. So we now have a Locations table [email protected] we need to add a parent table we can use to pass down all the home's Latitude, Longitude and Distance as lookup fields. We add the "Common Parent" table with only one record and made that related to all Location records. (we changed the reference field, "Related Common Parent" to a formula numeric field and put the number 1 in as a formula. Since there was only one Common Parent record, it's Record ID# was 1. So we created an automation that fires whenever a Location record's "Within Miles" field is updated. The automation will edit the parent record and update its Latitude, Longitude and Within Miles fields. This constant one to ALL relationship between the tables allowed us to always be sharing the last requested Latitude, Longitude and Mileage. Trigger: Action: Now that all the data is on all the location records, we added a formula numeric field to calculate the distance between the two. var number HomeLat = ToNumber([Home Latitude]); var number HomeLong = ToNumber([Home Longitude]); var number Lat = ToNumber([Destination Latitude]); var number Long = ToNumber([Destination Longitude]); var number Distance = Round(((69*($HomeLat - $Lat))^2 + (53*($HomeLong - $Long))^2)^0.5); If($HomeLat = 0 or $Lat= 0 , 0 , $Distance) Next we needed a way to flag only those locations that were within the "Within Miles" range. We created a formula checkbox field that would be checked if the Location record was within the range. So now we have the matching criteria to create the report link fields to display the results. The result: We cover topics like this in our daily, "Office Hours" webinars. Held M-F at 1:00 PM Eastern time. Feel free to drop in anytime. ------------------------------ Kirk Trachy , Senior Solutions Consultant QuickBase | 603-674-5454 M | [email protected] ------------------------------558Views2likes11Comments
How to display a thumbnail image on a table report
One of my favorite tips learned at EMPOWER2020 was from a session Chris Hutchens delivered titled Building for Mobile. He shared how to get a thumbnail image of a photo to display in a table report. While the session was geared towards mobile users, it's applicable to anyone that wants to show an image in a table report. I created a quick video to show demonstrate that little gem: https://youtu.be/M7p71Yo770c If you'd like to try this in one of your apps, simply watch the video and copy this code snippet to paste into a formula - rich text field: If(Length([Photo])=0,"","<img width=\"150\" src=\""&URLRoot()&"up/"&Dbid()&"/a/r"&[Record ID#]&"/e31/v0\"/>") Enjoy! ------------------------------ Freddie Sabbs Senior Solutions Consultant Quick Base [email protected] Cambridge MA ------------------------------400Views1like7Comments
Magic Buttons to Collapse/Expand Sections & Scroll to Top
This post describes how to build a set of three buttons that aid navigation of long forms. When a form has many sections and fields, one solution is to use Tabs. However, if there are several sections within a Tab, users may still have to do a lot of scrolling and clicking. The idea proposed here is to create a set of three buttons that float, always visible, at the bottom of the form: [Back to Top] [Collapse] [Expand] [Back to Top] simply scrolls to a standard location near the top of any page (#navTop). While Quick Base has a handy icon to scroll to the top, it's placed near the top. Normally you want to do this when you are near the bottom, so it's handy to have a button located there. [Collapse] and [Expand] use fairly simple JavaScript to collapse or expand all sections. The versions described here are compatible with Tabs in the following sense. They only collapse or expand within the current Tab. With these buttons, a user who knows the structure and contents of a long form can collapse them all, then scan the section-headers to open just the one section they need. Or, they can set a preference by collapsing all, then clicking on their favorite sections to expand them, and leaving the form that way each time they exit. Of course, there's always the option to open up all the sections, if the user really likes to scroll. In short, the three magic buttons accommodate the preferences of just about any user. Step 1. Create a formula-text field called "Bottom Nav" for the three buttons. The field's checkboxes must have "Allow some HTML ..." checked and should have the "Reportable" and "Searchable" boxes unchecked. For the formula, insert this: var text buttonStyle=" class='Vibrant' style='padding:3px; white-space:nowrap; vertical-align:middle; line-height:21px;'"; var text imageStyle=" style='vertical-align:middle; background-color:white;'"; "<span style='font-size:120%; font-weight:bold; position:fixed; bottom:20px; left:44px; z-index:1000;'>" & "<a href='#navTop'" & $buttonStyle & ">" & "<img class='TblIcon20 Upload' " & $imageStyle & ">" & " Back to Top</a>" & "<a href=\"javascript:" & [Collapse Sections] & "void(0);\"" & $buttonStyle &">" & "<img class='TblIcon20 Animation' " & $imageStyle & ">" & " Collapse</a>" & "<a href=\"javascript:" & [Expand Sections] & "void(0);\"" & $buttonStyle &">" & "<img class='TblIcon20 OSI_Model' " & $imageStyle & ">" & " Expand</a>" & "</span>" Some explanation ... The buttonStyle and imageStyle variables set the size and style of the buttons to be reasonably compatible with Quick Base standards. The <span> is set to be positioned at the bottom, with a z-index that floats it above all other elements of the page, left-aligned so as to obscure data-entry fields and thus prevent mis-clicks. As shown here, all three buttons use one of the standard images that Quick Base supplies as table-icons. You may prefer to use other images, or skip the images and just use plain text for the buttons. Finally, the [Collapse] and [Expand] buttons require some JavaScript. That's the next step. Step 2. Create two global variables, in the Variables section of Settings for your app. "Collapse Sections" is the name you should give to a text variable that contains the following: $('.sectionTitle').each(function(){ var $titleWrap = $(this).parent(); var $expandedTitle = $titleWrap.hasClass('expanded') && (this.innerHTML.length > 0); var $tabWrap = $titleWrap.parent().parent(); var $hiddenTab = $tabWrap.hasClass('ui-tabs-hide'); if($expandedTitle && !$hiddenTab){ this.click(); } }); $('#backToTop').click(); In words, this script finds every expanded section within the current tab, clicks each of those section-headers to make the section collapse, then scrolls up. "Expand Sections" is the name you should give to a second text variable that contains the following: $('.sectionTitle').each(function(){ var $titleWrap = $(this).parent(); var $collapsedTitle = $titleWrap.hasClass('collapsed') && (this.innerHTML.length > 0); var $tabWrap = $titleWrap.parent().parent(); var $hiddenTab = $tabWrap.hasClass('ui-tabs-hide'); if($collapsedTitle && !$hiddenTab){ this.click(); } }); $('#backToTop').click(); This script finds every collapsed section within the current tab, clicks each of those section-headers to make the section expand, then scrolls up. Step 3. Place the "Bottom Nav" field on your form. It should be the last field on the form. In addition, it should be immediately preceded by a section-header that has no name. Why a nameless header? Because it will be exempted from the collapsing and expanding actions of the JavaScript. We don't want the buttons to hide (collapse) or expose (expand) themselves! This last point reveals an important caveat for the whole method described here. It works best on forms in which all sections, except the last one containing the buttons, have a name. That's because of the way Quick Base handles nameless sections; essentially, they are intended to stay expanded (within a Tab, if applicable).354Views3likes7Comments
Forms, Tables, HTML Add some spunk to your forms. Add formatting to your forms.
If you want to add a bit of separation to your form I stumbled onto this. Maybe it's published but this works. See attached video So you have "TABS" and "Text" for form formatting. Well, let's say you want to delineate an area in a form by putting a box around it. Editing Form: 1: (first "text" element.) <table style="width:100%;border:1px solid black"> 2: (last "text" element.) </table> You can encompass many fields on your form by putting the </table> further down. ------------------------------ Douglas Folk ------------------------------299Views4likes7Comments
Is there any way to reset record Id for all records?
Our app has about 18,000 records in one of the tables, but the Record Id is at around 40,000 which means we've deleted a lot of records. Is there a way to reset the record Id and have it re-number based on record creation? Thanks242Views1like9Comments
Passing field into Code Page -
I'm trying to embed an iframe using IOL-- I'm able to embed the page I want but I'm not able to pass my qbase field (var state = $("catformula", xml).text();) -- into the url below..... I'm sure the issue is how I'm coding the "filtering" part of my URL --- &$filter=Accounts/Category eq 'qbasefield' Any help is greatly appreciated.....the code I'm using is listed below. (function(){ var querystring=document.location.search; if(/a=dr/i.test(querystring)) { //DISPLAY RECORD PAGE $("img[qbu=module]").closest("td").css("background-color","#FFFFFF"); var apptoken = "dwnxji38j"; $.ajaxSetup({data: {apptoken: apptoken}}); var dbidAccounts = "bjec5"; var promise = $.get(dbidAccounts, { act: "API_DoQuery", query: "{3.EX." + kRid + "}", clist: "21" }); $.when(promise).then(function(xml) { var state = $("catformula", xml).text(); var url = ""; url += "https://app.powerbi.com/reportEmbed?reportId=802c3595-add7-4a48-aa725ea0&groupId=178e260d-ca8b-4...; url += "&$filter=\"Accounts%2FCategory\"eq'" + state + "'"; $("<iframe></iframe>") .attr("frameborder", "0") .attr("width", "100%") .attr("height", "450") .attr("src", url) .insertAfter("#sect_s14"); }); } })();219Views1like12Comments