Links Banner
Main Content
Recent Content
QrewTip: Setting up SSO using Microsoft Entra
Welcome to Quickbase QrewTips! Today's installment is brought to us by a seasoned Technical Support Engineer: Elvis Agyemang!ElvisAgyemang_J has been with Quickbase for almost 5 years and has accumulated a solid knowledge of the platform in that time. In this QrewTip he walks us through the configuration and enablement of SSO to Quickbase using Microsoft's Entra (formerly Azure Active Directory) start to finish in less than 8 minutes!Three Words of Advice on Pipelines
Check out DanielBewley from Signet Health dropping three words of advice when using Pipelines. Couldn't agree more with Daniel. Tagging is the way. Come up with a naming convention that works for you and stick to it. Maybe instead of using a Pipeline, you could use a Formula Query. Like anything in Quickbase, there's more than one way to solve the problem. A well-designed formula query could accomplish everything you need without having to build a Pipeline. If email notifications are piling up within your account, that's the sign you should be using Pipelines. This allows you to set up a log for your notifications and give you more QA oversight on your Quickbase generated emails. Check out more Qrew Tips like Daniel's at the next Qrew Meet Ups, which can be found on our Events page! Help Articles and Other Resources: Formula Queries Help Intro To Pipelines Training Join The Pipelines QrewGet the Help You Need: A Guide to Quickbase's Technical Support Tools
4 MIN READ Navigating Quickbase is more than just building and managing applications. It’s about knowing how to ask for help, how to leverage the resources available to you, and where to find product updates to ensure smooth operations. In this blog post, we’ll recap the many ways you can get technical support to help you navigate Quickbase. How to Open a Case with the Technical Support team For help from our support team to troubleshoot, ask a question, or check on errors, you’ll want to connect with our wonderful technical support team. Click here for instructions on how to open a support case or manage your existing cases. Technical Support Team Expectations: Use Tech Support for one-off technical help, troubleshooting, and bug reporting. Technical Support Team is available 7AM-8PM ET M-F (or 24/7 for customers with an Ultimate Service Package) Our standard SLA for first response is 24 hours (shorter SLAs for customers subscribed to Enablement Services) 30-minute max phone calls or email communications Tech Support will not build for you; we have service offerings available for this Tech Support will not coach you through developing full solutions; we have service offerings available for this Watch How to Open a Support Case How to Search Online Help You can click the “?” in the top right corner of your application to search the online help. Use the search bar to find pertinent help files, Qrew Discussions, release notes and more. From here, you can also access the most recent release notes and get a sneak preview of what our product team is cooking up. You can also click here to access the latest version of our Online Help Library. Along the top of the page you’ll also find categories of articles that you may find useful: Building apps (Building Fundamentals, Relationships, Forms, Formulas, and more) Using apps (Add and modifying records, reports, emails, attachments, and more) Pipelines (Channels, Creating Pipelines, Scheduling Pipelines, and more) Managing accounts (Billing and Service Plans, Administration, Permissions, and more) APIs (JSON RESTful API Guide and JTTP API Reference) Resources (University, Community, Release Notes, Feedback, Managing Cases, & Terminology) Watch How to Access Online Help How to Check the Status Page Subscribe to this page to get the most updated information on Quickbase's platform status. I like to compare checking the status page to looking under the hood of a car. Is everything running smoothly? If your apps, reports, or Pipelines are moving a lot slower than usual, you can check the status page as part of your troubleshooting. This page will tell you if there’s anything atypical happening on the Quickbase platform that our product team is addressing. Be sure to bookmark the status page to get a real-time status report with one click. Watch How to Access the Status Page How to use the App Exchange The App Exchange is a source of pre-built Quickbase apps made by other users like you. It's a good way to make use of other Quickbase app builders' expertise and get a fully functional app live faster than you could if you built it from scratch. Any app you get from the App Exchange is customizable, so you can make changes to suit your specific workflow and processes. To access the App Exchange, go to the “My Apps” page in Quickbase and click “explore sample apps”. Click here to learn more about using the App Exchange. In addition to the App Exchange described above, we have a new version of the exchange in beta! It is available as a tab on the top left side of the screen next to the solutions tab. What is neat about this beta version is that you can access both apps and formulas that you can use anywhere in your apps. Click here to learn more about this beta version of the exchange. Watch How to Access the App Exchange & Beta Exchange Release Notes Stay up to date on the latest Quickbase enhancements, new features, and early access opportunities from the Quickbase Product team. Bookmark the release notes page here. This is where you can find details about what’s been rolled out and what’s coming soon! Watch How to View Release Notes Conclusion Quickbase is more than just a platform for building and managing applications. It's a world of possibilities waiting to be explored! And with Quickbase's technical support tools, you can navigate this world with ease. From opening a case with the Technical Support team to using the App Exchange, Quickbase offers a variety of resources to help you troubleshoot issues, ask questions, and get the help you need. Plus, with the latest Quickbase enhancements and early access opportunities available through the release notes, you can stay ahead of the game and keep your apps running smoothly. Leveraging these technical support tools will ensure you’ll always get the most out of the platform.453Views3likes0Comments
Welcome to the Community Introduce Yourself Here!
It is possible for our community to be such a vibrant and productive place thanks to all of the members who come to contribute questions, share their expertise, and show off their achievements. In a fast moving and technical community it can be tough to know where to get started connecting with other community members. A great place to break the ice is right here by introducing yourself and telling us a bit about you. Not everyone likes an open ended bio so we do have a few suggestions if you aren't sure what to say. 1. What is one of the biggest challenges you tackled/or hope to tackle in your current job? (Don't worry you don't have to include Quick Base in this one) 2. If you could snap your fingers and suddenly have any skill mastered today what would it be? 3. Do you have a Quick Base feature you feel you have mastered or one you are really curious to learn? I'll get us started by introducing myself. I am Evan the community manager here at Quick Base. I got started working at Quick Base in 2016 as a member of our Care team and then transitioned into working on our Quick Base Community. This has given me the opportunity to interact with a huge range of Quick Base problem-solvers both here in the community and at places like Empower. 1. The biggest challenge I have tackled recently have been working on the update for this community over the last 6 months. It has been a great learning experience in project management. 2. If I could snap my fingers right now and suddenly have a skill mastered I would have to go with carpentry. I have always been jealous watching people who just know how to build things from scratch like that. 3. I am really interested to build out my skills more when it comes to APIs and integrations. Especially as we add Cloudpipes to our Quick Base offerings. ------------------------------ Evan Martinez Community Manager ------------------------------512Views3likes13CommentsQrew Tip: Calculations per Record
Today TaylorHardy is going to show us where to look to understand if a field is a resource hog. Want to explore more on your own? Here are some additional resources to check out. Understanding performance in Quickbase https://help.quickbase.com/docs/understanding-performance-in-quickbase Performance Tools https://help.quickbase.com/docs/understanding-performance-in-quickbase Performance analyzer https://help.quickbase.com/v1/docs/analyzing-performance-of-apps Performance Insights https://help.quickbase.com/docs/performance-insights Performance optimizer https://help.quickbase.com/docs/performance-optimizer Performance and best practices https://help.quickbase.com/docs/performance-and-best-practicesSecure Links for Instant Access and Full Control
CharlieMurawski dives into how secure links work. Learn how to create secure links with unique URLs using an access key. Watch as we walk through a demo where we create access keys, generate links, and show you how to give and revoke access quickly with secure links. This feature allows temporary, controlled access to records, making it easy to share information securely with external users.
How to Use the Bucket Channel to Schedule an Archive to Box
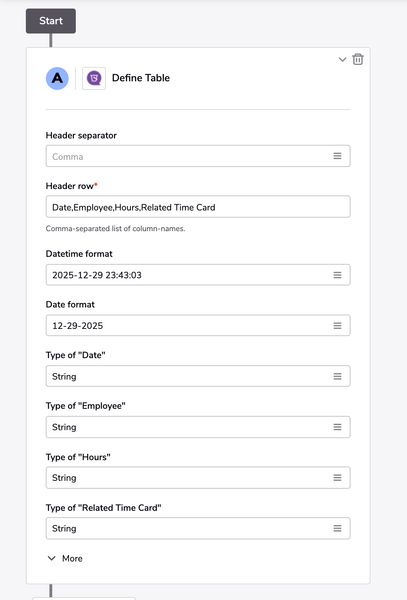
3 MIN READ How to Use the Bucket Channel to Schedule an Archive to Box You may be wondering what the Bucket Channel is now that you've started to utilize our newest feature, Pipelines. The Bucket channel is a built in channel that allows you to create temporary storage tables, or objects, in the pipeline and then access that data which will be available for all your future logics. In this tutorial we will utilize this method to create a temporary CSV table to archive data from Quickbase to Box on a monthly schedule. Before we start the tutorial you will first want to access pipelines and connect to the Box Channel. For step by step information on connecting to Box, click here. Now that you have connected to the Box Channel we can start creating our Pipeline! Step A: Define Your Table Using the Bucket Channel 1. Locate the Bucket Channel > Pipelines Rows > Define Table. Drag this Action to the first step of your Pipeline. 2. Determine your table Header Separator. In this example, I'm using Comma. 3. Define your header rows. NOTE: These will correspond to fields in Quickbase in later steps. For my example, I'm archiving Time Cards. I want a Date, Employee, Hours, and Related Time Card as my headers. Which should look as follows... Date,Employee,Hours,Related Time Card 4. Determine the Date and DateTime Formats. 5. Define the type of field needed for each column. In this example it is fine to leave all columns as "String". Step B: Search Your Quickbase table 1. Go to the Quickbase Channel > Records > Search Record. Drag this Step below Step A. 2. Select the Table you want to search your records for. 3. Select all the fields from the table that will be needed in upcoming steps. e.g. Date, Employee, Hours, Related Time Card. I also created a formula check box for "Previous Month" to use as a query. 4. (optional) Create a query for your records so we're only archiving the data you need. In my example, I'm saying when the "Previous Month" is "Yes"(true/checked). Step C: Add a Row for each record returned from Step B. 1. Locate the Bucket Channel > Pipelines Rows > Add a Row, drag this step under where it says "For each Record Do" for Step B. 2. Select Step A where it says "Pipeline Row". This will then populate your fields defined for each column in your spreadsheet. e.g. Date, Employee, Hours, Related Time Card. 3. Drag the appropriate fields from Step B to their Corresponding columns. Step D: Download CSV 1. Locate the Bucket Channel > Pipeline Rows > Download CSV. Drag this step below Step B. 2. Select Step A, in the area for "Pipeline Row". Step E: Upload File in Box 1. Locate the Box channel > Files > Upload File In. Drag this step below Step D. 2. Determine the Folder Path needed. In this example I will be uploading to a folder I titled "QB". Your folder path should look as follows...All Files/QB 3. Name your file. In this example I want the File name to be the date the upload was made. To do this I'm using a date/time conversion to return todays date and append with .csv. e.g. {{time.now|date_mdy}}.csv For more information on working with date and time in pipelines, click here. 4. Drag the download URL object from Step D to the URL in Step E. Final Step: Schedule your Pipeline! In the upper right corner of your screen locate where it says "Schedule pipeline" (just to the right of "Run Pipeline"). From here you can set the pipeline to run on the 1st of every Month. NOTE: the timezone is in UTC. Our pipeline is now complete! Below is what the final product should look like. When you're ready feel free to test the pipeline by clicking, "Run Pipeline". Go to Box and you will see your file uploaded! Find more Pipelines How-Tos Below: Pipelines and Object Linking How to use Pipelines to email a report at a specific time of day Importing Pipeline YAML Build better trend reports with Pipelines Generate template records with Pipelines428Views2likes0CommentsEasy App Organization Tips for New Builders
3 MIN READ One of my joys as a Customer Success Manager is to connect with new builders to make sure they have all the resources and support at the beginning of their app-building journey. The top comment shared with me is that they can build an app but it isn’t pretty. Their first app is usually a “Franken-app.” It’s alive and can do what is required, but it looks a little wonky stitched together. Let’s change this! As app builders, we are also part designers. The way the app looks and feels affects the end-user experience. UI/UX designers live by this rule: Aesthetics + Function = Higher Adoption. Meet the Marie Kondo of Quickbase In my quest to find app beautifying tips, I got to meet Laura Linssen from J. J. Keller & Associates, Inc. After reading her blog feature and hearing about her Empower presentations, I had to ask her for ways new builders can create apps with the perfect balance between function and aesthetics. Is it even possible? If yes, where do they start? My interview with Laura offers many gems of inspiration for builders old and new. Laura describes her app aesthetic as “functional organization in color” which she defines as organizing things together and using colors to tell a story. You can add color to conversation threads, add color variations to group separate workflows, tabs, sections, and so much more. If you don’t have enough time to watch the video above, here are instant tips and tricks from Laura that you can implement right away to make an impact on the look and feel of your app. Always plan and build your apps with the end-user in mind. Get them involved in the planning process so they can proudly own the app and help train others on how to use it. You may end up spending closer to 50% of your time in the planning stage, but the investment in upfront planning will save you time in the long run. Accent the functionality of your app with color. Apply color to buttons, sections, tabs, important data, and formula functions to highlight what users should be drawn to. Be obvious with what users want to see. Check out what color palettes are trending and have fun! Don’t be afraid to use color combinations that are different from your company’s branding guide – especially for internal apps. There are many inspirational color variation sites to choose from like Canva, Adobe Color, and Design Bombs. Google 2023’s color of the year (it’s Viva Magenta) and see if you want to use it in your app. There are tons of color articles to read, and you can also use the hashtag #colortheory to search on social media to stay in tune with what’s hot. Many color generator sites are free and offer expert tips on color theory and psychology. Skip tables on dashboard-driven apps. Let’s be honest - tables are mostly clutter on a screen and aren’t generally useful to everyone accessing the dashboard. For cleaner lines and clutter reduction, you can link your tables to the dashboard for users who want to drill into the data. Use tabs, section headings, buttons, and formula functions to keep it organized. Formula functions can help show or hide what users need to see while keeping clean lines on forms or dashboards. Adding color-coded tabs and section headings to forms is a game-changer! Don’t be afraid of white space! Our eyes need a break from walls of data. Use empty space and formulas to organize your dashboards, forms, and reports. For more color and functional app organization tips, be sure to watch the full interview above. A huge thank you to Laura Linssen for taking the time to talk with me and share her app beautifying tricks with the Quickbase world. If you have any questions or comments for me or Laura, feel free to comment below and we’ll be happy to follow up.84Views2likes0Comments
Find the nearest Starbucks using QuickBase
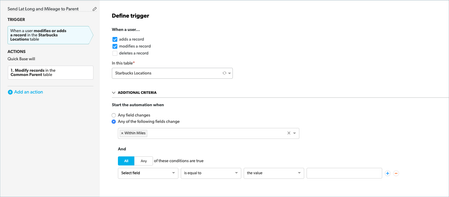
Last week Howard popped into an "Office Hours" webinar asking about how to find the closest customers to a given Latitude and Longitude location. Well you can do that with QuickBase. I went looking for a CSV file with a bunch of Latitude and Longitude locations and I found a file with all the Starbucks locations in the US. The essence of the application is to find a Starbucks, enter the distance you want to search and return a report and map of all those locations within that distance. This can be calculated if you have both the Home and the Destination's Latitude and Longitude. So we now have a Locations table [email protected] we need to add a parent table we can use to pass down all the home's Latitude, Longitude and Distance as lookup fields. We add the "Common Parent" table with only one record and made that related to all Location records. (we changed the reference field, "Related Common Parent" to a formula numeric field and put the number 1 in as a formula. Since there was only one Common Parent record, it's Record ID# was 1. So we created an automation that fires whenever a Location record's "Within Miles" field is updated. The automation will edit the parent record and update its Latitude, Longitude and Within Miles fields. This constant one to ALL relationship between the tables allowed us to always be sharing the last requested Latitude, Longitude and Mileage. Trigger: Action: Now that all the data is on all the location records, we added a formula numeric field to calculate the distance between the two. var number HomeLat = ToNumber([Home Latitude]); var number HomeLong = ToNumber([Home Longitude]); var number Lat = ToNumber([Destination Latitude]); var number Long = ToNumber([Destination Longitude]); var number Distance = Round(((69*($HomeLat - $Lat))^2 + (53*($HomeLong - $Long))^2)^0.5); If($HomeLat = 0 or $Lat= 0 , 0 , $Distance) Next we needed a way to flag only those locations that were within the "Within Miles" range. We created a formula checkbox field that would be checked if the Location record was within the range. So now we have the matching criteria to create the report link fields to display the results. The result: We cover topics like this in our daily, "Office Hours" webinars. Held M-F at 1:00 PM Eastern time. Feel free to drop in anytime. ------------------------------ Kirk Trachy , Senior Solutions Consultant QuickBase | 603-674-5454 M | [email protected] ------------------------------625Views2likes11Comments